Recovering deleted files after you have emptied the Recycle Bin, including Word, Excel, PowerPoint, email, photo, database and more files...
The easy recovery software - Data Recovery Wizard restores deleted files no longer in the Recycle Bin. It can recover the deleted Word, Excel, PowerPoint, photo, Email, database, and all document formats and folders in Windows 2000, XP, 2003, Vista, 2008, Windows 7, 8, which have been emptied from or by-passed the Windows Recycle Bin.
When a file is deleted from your computer, you just lose the file entry in My Computer. The file content still exists on the hard disk, Windows simply marks the hard drive space as being available for use so that you can write new files. If you manage to start an undelete process before Windows uses that part of the hard drive to write a new file, all you have to do is set that flag back to "on" and you get the file.
Obviously, the sooner you try to restore a file, the more successful you'll be. But stop a moment and think about the other things that could cause this part of the hard drive to be overwritten. If your hard drive is pretty full, the odds are much greater that Windows will grab your precious unallocated space for its next write. Or, if you defrag the hard drive, you run the risk of unused parts of the drive being overwritten! (This also means that if you are running silent background defrags services like Diskeeper, or if you have defragged utilities scheduled to defrag automatically, you might get blindsided - lose your chance at data recovery - if you don't halt them until you have your deleted file recovered.
For that matter, simply starting up Windows or, to a lesser extent, shutting down Windows causes many tiny files to be written. You really want to avoid these processes if possible.
So the first rule is: Stop using that computer immediately! This minute! Right now! Use another computer to get the Data Recovery Wizard you need. Please see: How to install a hard drive?
This is also one of the places where the well-planned partitioning of your hard drive has a huge advantage. Partitions physically mark off different parts of the hard drive. If, for example, you have your data and program files on their own separate partitions, and it's a data file that you want to recover (which is usually the case), then Windows startup or shutdown won't touch that part of the hard drive. If you have the swapfile / pagefile on its own partition, and all of your directories for temporary files on another, then these most-changing and most-written files will also be kept from overwriting the part of the drive holding the files you want to recover. However, if you take that 80 GB hard drive and make it all one big single C: partition, then you run the risk of making your file unrecoverable anytime the swapfile resizes, or any time Windows writes a temporary file of any kind... and this could be pretty much at any moment whatsoever! Partitioning gives enormous advantage in file recovery.
 2. Select the file types you want to recover. Tick 'Search all lost files automatically' to find all lost file types. Tick 'Ignore bad sectors' to skip bad sectors when scanning.
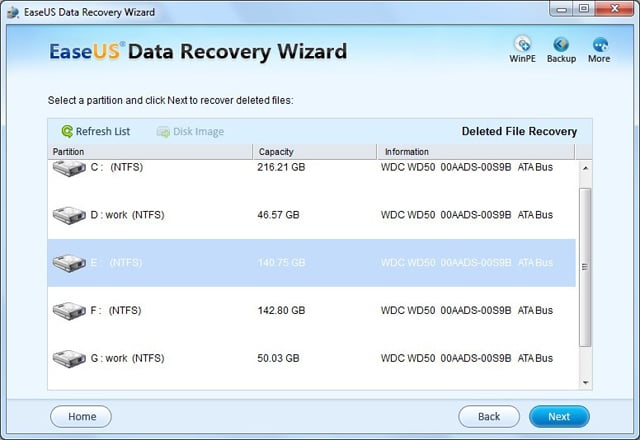
 3. You can see the list of all volumes found on your computer, select the exact drive and press the "NEXT" button to search. If you are familiar with file system details, you can change "Option" before pressing the "NEXT" button.
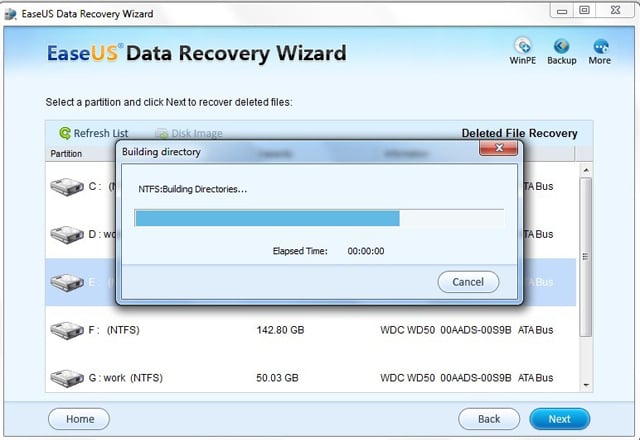
 4. Data Recovery Wizard will read file system on selected volume and search the files. This step may take some time depending on the size of disk space. You have to wait until scanning is finished.
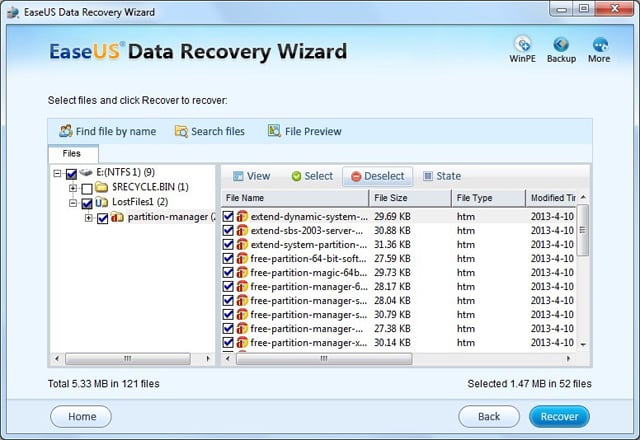
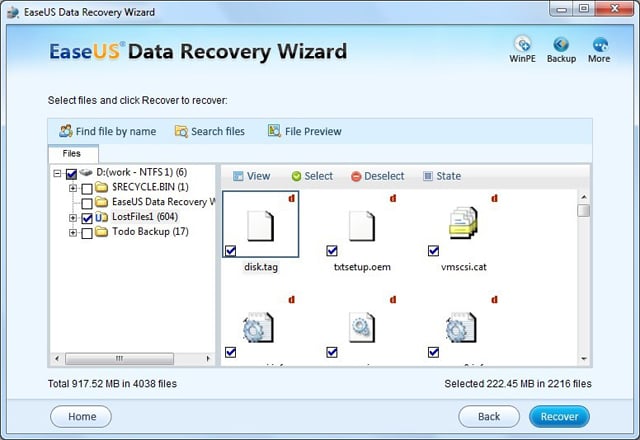
 5. After this scanning is finished, you'll see file/folder tree.
Note: If you are not able to get the desired results after Deleted File Recovery, go back to home window and select the option "Complete Recovery" or "Partition Recovery".
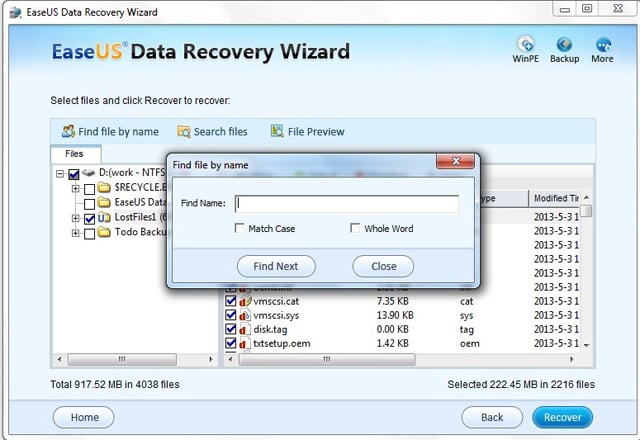
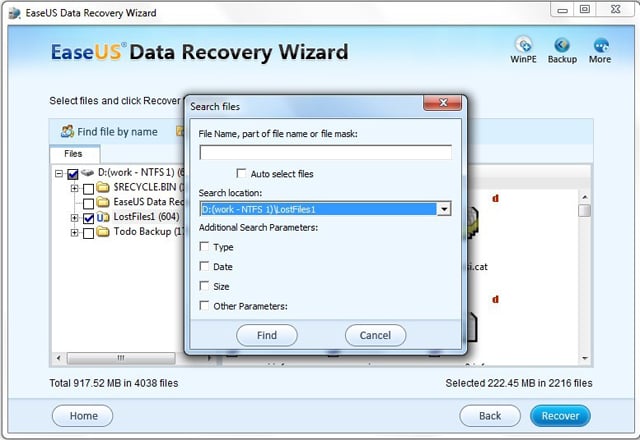
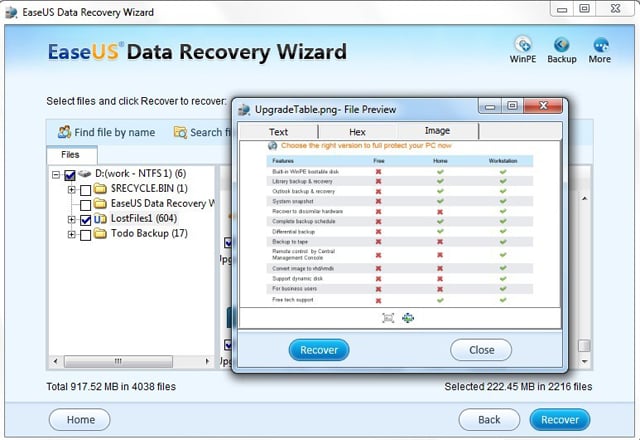
 6. The "Search files" or "Find file by name" option makes finding the file you need much easier. You also can check the quality of the data in the container by the "File Preview" option.
 7. Select the files or folders that you want to recover and press the "NEXT" button.
 8. Select a directory and press the "NEXT" button to save the files.
Caution: Saving file(s) to the partition or drive where you are recovering data, for it may result in overwriting data and permanent data loss!
Please see "Deleted File Recovery" for more details.
The trial version of Data Recovery Wizard gives you a much fairer idea about chances of data recovery from your hard disk before deciding upon the purchase.
The easy recovery software - Data Recovery Wizard restores deleted files no longer in the Recycle Bin. It can recover the deleted Word, Excel, PowerPoint, photo, Email, database, and all document formats and folders in Windows 2000, XP, 2003, Vista, 2008, Windows 7, 8, which have been emptied from or by-passed the Windows Recycle Bin.
Why can you recover deleted files?
Emergency file recovery requires more than the correct tool, though. It is requested to know how file deletion occurs, and what you have to do to maximize the chances of a successful recovery.When a file is deleted from your computer, you just lose the file entry in My Computer. The file content still exists on the hard disk, Windows simply marks the hard drive space as being available for use so that you can write new files. If you manage to start an undelete process before Windows uses that part of the hard drive to write a new file, all you have to do is set that flag back to "on" and you get the file.
Obviously, the sooner you try to restore a file, the more successful you'll be. But stop a moment and think about the other things that could cause this part of the hard drive to be overwritten. If your hard drive is pretty full, the odds are much greater that Windows will grab your precious unallocated space for its next write. Or, if you defrag the hard drive, you run the risk of unused parts of the drive being overwritten! (This also means that if you are running silent background defrags services like Diskeeper, or if you have defragged utilities scheduled to defrag automatically, you might get blindsided - lose your chance at data recovery - if you don't halt them until you have your deleted file recovered.
For that matter, simply starting up Windows or, to a lesser extent, shutting down Windows causes many tiny files to be written. You really want to avoid these processes if possible.
So the first rule is: Stop using that computer immediately! This minute! Right now! Use another computer to get the Data Recovery Wizard you need. Please see: How to install a hard drive?
This is also one of the places where the well-planned partitioning of your hard drive has a huge advantage. Partitions physically mark off different parts of the hard drive. If, for example, you have your data and program files on their own separate partitions, and it's a data file that you want to recover (which is usually the case), then Windows startup or shutdown won't touch that part of the hard drive. If you have the swapfile / pagefile on its own partition, and all of your directories for temporary files on another, then these most-changing and most-written files will also be kept from overwriting the part of the drive holding the files you want to recover. However, if you take that 80 GB hard drive and make it all one big single C: partition, then you run the risk of making your file unrecoverable anytime the swapfile resizes, or any time Windows writes a temporary file of any kind... and this could be pretty much at any moment whatsoever! Partitioning gives enormous advantage in file recovery.
To recover files from a drive containing deleted files or folders, follow these steps:
Key Features:
- Recover deleted files/folders even after recycle bin has been emptied or use of Shift+Del key.
- File recovery from Missing or Lost folders.
- Recognize and preserve long file names when restoring files & folders.
- Multi-Disk Drive Support - Performs FAT/NTFS, EXT2/EXT3 recovery on all IDE, EIDE, SCSI and SATA disk devices.
Note: If you are not able to get the desired results after Deleted File Recovery, go back to home window and select the option "Complete Recovery" or "Partition Recovery".
Caution: Saving file(s) to the partition or drive where you are recovering data, for it may result in overwriting data and permanent data loss!
Please see "Deleted File Recovery" for more details.
The trial version of Data Recovery Wizard gives you a much fairer idea about chances of data recovery from your hard disk before deciding upon the purchase.
If you are running Mac OS X, please go to see EaseUS Mac data recovery software. Detailed instruction refer to Recover deleted files on Mac
No comments:
Post a Comment